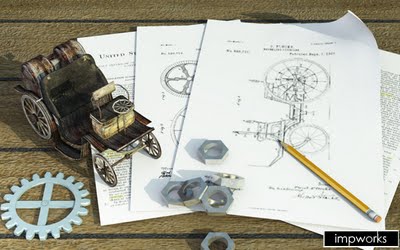
The picture I used for my Wordless Wednesday this week was made for the latest issue of Ragnarok. Various 3d models were assembled in Vue 6 Infinite but this one could have been made in any version of Vue. I’ll start with the easy bits. The bench itself is a cube with the old wood material from Cornucopia 3D. The car is the Steam Carriage model from Daz3d loaded through Poser 7. As with using Vue 7 Infinite Poser 7 was overkill for this poser artist
or even Daz Studio with a bit more work should be able to save the model for use in Vue. The pencil was a free model from turbo squid added quite late on when a mug I’d made myself took up too much space in the picture.
I created the sheets of paper, the nuts and the cog I made myself. The nuts were the simplest to model. I extruded a hexagon with a circle cut from the middle. I imported one into Vue, textured it with Vue’s brushed steel material. I duplicated the nuts and then used Vue 6’s new smart drop to drop them one at a time to create the pile till I was happy with how it looked.
The cog was produced in a similar way by first using Cinema 4D’s cog tool and a circle then extruding these to make the basic cog. Two cuboids across the cog and combined with it using a boolean addition to make them into one shape. I finished the cog by adding a bit of detail to where a spindle would go through. The cog was then imported into Vue and textured and positioned in the scene.
The sheets of paper began life in Hexagon 2 as simple rectangular polygons. Three of the sheets were made by saving the polygon out as it came and then working on them. The one with the corner twisted I created by first subdividing the sheet into a grid of smaller polygons and then by carefully moving the corner and other points to create the curve. This was saved as an obj file. Both the flat and curved version were loaded into UV mapper classic and I created a UV map and resaved the model. The pages were then textured using images I created in paint shop pro based on research using Google’s patent search. These models were then brought into Vue and I fiddled around with how they were laid out.
Once I was happy with the structure of the scene I tried a variety of camera positions and focal lengths to get the best result. I settled on a camera with the equivalent of a 90mm lens in the real world. Next I tweaked the lighting – there is one light providing the majority of the light but I added a four fill light that don’t cast shadows just to lighten up the darker parts of the picture. Since the sky isn’t visible I removed all the clouds to speed up the final render.
Finally I did a series of small renders with varying settings to find out how I could render a suitable picture for print in a reasonable time. Then I set the picture to the dimensions for the final image and set my computer rendering and went to watch a DVD. About an hour later the finished picture was ready. If I’d been rendering a smaller version for the web it would have been finished a lot quicker.


Leave a Comment